A Twist On an Old Favorite

Monday, November 26, 2012


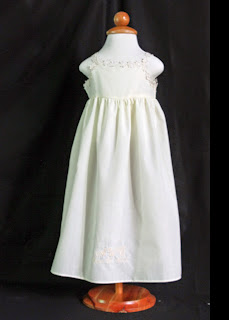
Baby Grace's Dedication Gown

I apologize I haven't posted anything in awhile. 
This little gown was too special to not post.
Mom wanted all ...

GLAMOR

The mom found this amazing ribbon rose embroidered fabric.
Once it arrived I knew exactly the silhouette it deserved

My First Ever Baby Mermaid Gown

I loved working with this fabric it sewed beautifully
This gown almost has a sculptural feel with its
little cap sleeves and tulle inserted in the hem

I love the brush gold linen sash. 
I love how it complements the bead work and fabric

If you this gown and would like to learn more about having one made
for your little mermaid
email Jennie at:


The Ultimate Handme Down

Monday, June 18, 2012

Can you imagine being able to wear the exact gown that not only your mother wore, but your Grandmother before her along with your sisters and cousins.  Well this is the case for the Zgorski women, their Grandmother's gown has been worn by 7 family members spanning 3 generations. 
Such a beautiful story of family tradition.


My heart just swoons at the thought of having one of my christening gowns worn by so many family members and spanning over multiple generations.

Photo by: Joseph Victor Stefanchik/FOR THE WASHINGTON POST

The above photo has to be my most favorite photos from the Washington Post Article.  Notice the labels sew into the under skirt; it reminds me of a slip I did for a current project. 


The front of the christening slip has the baby's monogram and christening date embroidered on it.  While there is a tiny label hand sewn in the back that lists the great-grandmother's monogram and wedding date along with the maternal grandmother's monogram and wedding date. 


The actual christening gown was made from the wedding dresses of the maternal great grandmother and maternal grandmother.  It was a very moving project to be able to lovingly refashion two gowns into something that will be worn by all the new babies welcomed into the family ... Starting with baby Aubry.


Baby Carlie

Tuesday, May 15, 2012

I hope everyone had a fabulous Mothers Day!
For me, Mother's Day 2012 began on Friday morning when I went to drop off my latest project,
Baby Carlie's Christening outfit. 
It was made from the train of her Mother's wedding gown.


I love the fact that her Mom saved the picture of her wedding gown
that she tore out of the bridal magazine at the salon almost 15 years ago.

Carlie's has three older brothers ages; 12, 8 and 2.  Her mom has been waiting 14 years for this little princess to arrive.  She has told me that since the day she was married she dreamed about having a daughter
and having her wedding gown made into the christening gown. 


This was such a fun project to complete.
I really enjoyed removing the lace from the hem of her train and
 reworking it for Carlie's Christening Gown and Blanket.


Her Mother also requested that I make a Monogramed Christening Blanket.


Above are a few detail shots of her blanket


When Chris opened the box that contained Carlie's Christening Gown
her eyes filled with tears.
It was an amazing moment to watch her face light up and hear her reminisce about buying her wedding gown and talk about how she dreamed of having a daughter who would be able to wear a Christening gown made from her Wedding dress.
This Mother's day I was able to help make one mom's dream become a reality.
Life doesn't get much better than that :)


Interested in having a dress like this made for your little one ... email me at:


Farm House Fabulous a Re-Decorating Story

Tuesday, May 1, 2012

Meet Maritza's dinning room,
It was a room in need of an update...


In the original room the walls were painted with
Eddie Bauer Crimson EB28-3
Although she loved the idea of a red dinning room
Maritza wasn't sure if her current color ideal.


She wasn't happy with the window treatments either.
When talking with her she mentioned that her ideal room would be calming,
warm and inviting.
A place where friends and family would happily gather not only on holiday but over a cup of coffee after the kids had gone to bed.
She wanted a room that felt lived in!

After reviewing my notes and much thought

We decided on going in the following direction

FARM HOUSE FABULOUS

I stumbled upon upon the following Ralph Lauren Linen
and new it would be ideal for her drapes.

We decided on moving forward with the floral linen.


The inverted pleated drapes were left unlined
so that the afternoon sun would shine through adding additional warmth to the space.

These window treatments became the jumping off point
for the rooms color story.


Originally she wanted to not have to repaint the entire room.
So we opted to use 
 Benjamin Moore Arroyo Red 2085-10
in a glaze finish over the upper wall
Using the following technique
and painting the lower wall in
Benjamin Moore RM - Richmond Bisque


As with most renovation things change as you progress
The orientation of the paint color on the walls flipped
and we lost the faux finish.

The color choices were so perfect
that switching the orientation
didn't affect take away from the over all look


The hard work is completed
and now
 it's time to accessorize!

Like this space interested in sharing your decorating challenge?
Just want a second opinion on your furniture selection ...
email me your biggest dilemma
I'd love to help

Wedding Gown Conversion

Thursday, April 26, 2012


Your big day has come and gone, and the dress that you dreamed about since you were a little girl sits quietly in a box stowed away out of site.  It could be tucked on a shelf in your closet, under the guest room bed or worse sitting in your musty basement ...

Wouldn't it be nice to give your special gown a second life so it may be used and treasured for generations to come.  I can happily accommodate most wedding gown conversion requests.  With over 8 years of experience in this area I know you will be thrilled with the one of a kind design I create for you. 


             The Maddison                                                     Convertable Christening
       Convertable Christening                                            The Fiona


If you like what you see and would like to learn more about my
wedding gown conversion services send an email to:

A Fairy Birthday Party

Thursday, April 12, 2012

Back in October, my Little Bean turned 3!
I can't believe her 3rd birthday party was 6 months ago ....
She is becoming more and more of a
Big Girl
everyday
This thought makes me so sad

But, do you want to know what makes me happy?

These little wings!
I found them in the dollar section at my local Target Store.
I embellished them with a little green glitter fabric paint,
some ribbons,
crystals and the one big flower.


I think they are stinkin' cute
that I have them hanging on the wall
in her bedroom so I can see them everyday.


They make me HAPPY!


This little fairy party dress also makes me
HAPPY
I used the bodice portion of my Farilicious Pattern
to create the top of this dress.
Instead of smocking it with elastic thread like I did for
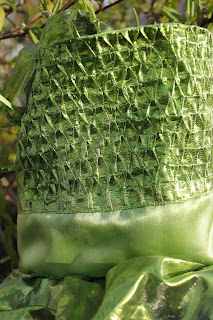
I used sewed multiple rows of pintucks
and then ran a straight seam across them;
making the pintucks "kiss" on opposite rows
to create this smocked bodice.
Wanna learn more about smocking? 
I have provided some links to a few great tutorials

Willow loved her
Big Tinker Belle Birthday Party Bash
and her special party dress.

Wanna know, what else makes me happy?

Knowing in just 6 months I get host another party
for my favorite little fairy.

I wonder what her party theme should be this year?
Any suggestions ...

Bean's Latest Request ...

Wednesday, April 11, 2012

Mommy will you make me a VOLCANO DRESS for Easter?
Those were the words uttered by my sweet 3 year old daughter.
My first thought was, Dear God!
What in the world could she possibly mean by that ...

So I started to spin those creative wheels in head
and this is what I came up with


I'm not sure if this can be classified as a Volcano Dress ...
as she was not engulfed in flames and ashes
But I guess you could say there was an


EXPLOSION OF TULLE

Oh please take note of the beautiful Silpada bracelet that the Easter Bunny brought Miss Willow,
cuz she lost it in under 3hours ... Aughhhhh!
Thank Goodness for the kind Waiter who humored me
and took a second look at where we were seated for Easter Brunch. 
Not sure when she will get to wear it again ...lol!!!

This is one of my favorite pics from the day.
She looks so thoughtful 


Brother and Sister
Nothing could be sweeter

If I only knew what secrets they were sharing.

Hope you had a Happy Easter!

DIY Grocery Store

Monday, April 2, 2012


Last summer I did a guest post on Someday Crafts.
It was an awesome honor to post there.
I thought it was time to repost it here on my blog.

Today I'm going to show you how to knock off the PB Kids grocery store.
First my husband constructed a wooden frame from 1" x 2"s.
He used angle brackets to secure the corners of the frame.
The finished frame measured 49 1/2" tall, 24" wide,  and 19" deep.
Then I began covering the frame with canvas;
you could also use a drop cloth, old drapes, or even bed sheets
would work for making the frame cover.
 First I pinned a 1 1/2 yard long piece to the frame.
I made sure to place the selvage edge along the right back edge and pinned it to my frame
By placing the selvage edge along the outer frame I save myself from having to clean finish that edge.
I then folded the fabric allowing for some seam allowance along the right front corner. 
(see above far right photo)
Using straight pins I pinned along the frame edge; this will be my sew line.
After I sewed along my pin line I used my sewing sheers to slice open the fold.
Press your seams open and you are ready to cover the left side.

Again make sure you line your selvage edge along the left back side and pin to frame.
Pin along the left front corner to create your sew line.
Run through your machine making sure not to run over any pins.
Cut off extra fabric along seam and press open.
Hem the bottom pressing under a 1/2" and then fold over an 1" 
Top stitch to give your hem a clean finished edge.

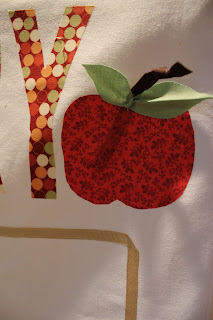
Next I printed out the letters to spell the word
 GROCERY
I just played in Microsoft Word experimenting with different font styles 
and sizes till I found the one I liked.
 "Heat n Bond" was ironed to my fabric.
I pinned my computer printed letter pages to the fabric 
and cut them out.
I then peeled off the backer paper exposing the adhesive.
 Pin the covering to the frame with your hem line flush with the floor.
Pin the letters to the front of your store.
Positioning them to fit your taste.
Use straight pins to secure the letters until you can iron them in place.
I used a 1/4" wide grosgrain ribbon to outline the store front window opening.
I eyeballed the placement of the ribbon while the cover was pinned to the frame.
Just fold the ribbon over when you reach the corners.
I edge stitched around both sides of the grosgrain ribbon to secure in place.

To make the windowsill I pressed a 3" wide piece of tan fabric to the heat n bond.
I made sure the piece was longer than the window opening.
Remove the paper backing and position your windowsill while the covering is pinned to the frame.
Remove fabric covering from frame and iron to fabric windowsill in place.
The greatest part about using the "Heat n Bond" is that if you want you can leave the 
sill as is.  There is no need to finish off the applique edges.
I chose not to finish off the edges of my letters because I felt it took away from the print I used.
But, I used a satin stitch to go around the edge of my windowsill to add a little dimension.
I also thought this opening would see a lot of wear and tear,
so by finishing off the edge I am strengthening the opening.

At this point you may add the roof to your store.
I attached a piece of ribbon that was 18" long to the outer corners of my store to form the "ties".
These "ties"will be used to secure the cover to the frame.
I also placed some in the seams above and below the window frame opening.

 We are almost done!
At this point I gave the frame cover one last good pressing.
Place it over your frame and tie into place.

Using tiny sheers I cut along the inner edge of my window.
Making sure not to cut into the ribbon or the fabric windowsill.


The store is now completed!


We are OPEN and ready for business!

If we could only get some customers ... LOL!


Related Posts Plugin for WordPress, Blogger...