Showing posts with label girls dress. Show all posts

A Fairy Birthday Party

Thursday, April 12, 2012

Back in October, my Little Bean turned 3!
I can't believe her 3rd birthday party was 6 months ago ....
She is becoming more and more of a
Big Girl
everyday
This thought makes me so sad

But, do you want to know what makes me happy?

These little wings!
I found them in the dollar section at my local Target Store.
I embellished them with a little green glitter fabric paint,
some ribbons,
crystals and the one big flower.


I think they are stinkin' cute
that I have them hanging on the wall
in her bedroom so I can see them everyday.


They make me HAPPY!


This little fairy party dress also makes me
HAPPY
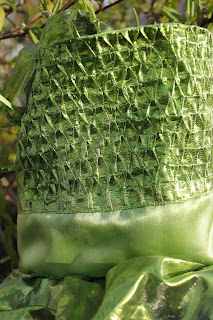
I used the bodice portion of my Farilicious Pattern
to create the top of this dress.
Instead of smocking it with elastic thread like I did for
I used sewed multiple rows of pintucks
and then ran a straight seam across them;
making the pintucks "kiss" on opposite rows
to create this smocked bodice.
Wanna learn more about smocking? 
I have provided some links to a few great tutorials

Willow loved her
Big Tinker Belle Birthday Party Bash
and her special party dress.

Wanna know, what else makes me happy?

Knowing in just 6 months I get host another party
for my favorite little fairy.

I wonder what her party theme should be this year?
Any suggestions ...

Bean's Latest Request ...

Wednesday, April 11, 2012

Mommy will you make me a VOLCANO DRESS for Easter?
Those were the words uttered by my sweet 3 year old daughter.
My first thought was, Dear God!
What in the world could she possibly mean by that ...

So I started to spin those creative wheels in head
and this is what I came up with


I'm not sure if this can be classified as a Volcano Dress ...
as she was not engulfed in flames and ashes
But I guess you could say there was an


EXPLOSION OF TULLE

Oh please take note of the beautiful Silpada bracelet that the Easter Bunny brought Miss Willow,
cuz she lost it in under 3hours ... Aughhhhh!
Thank Goodness for the kind Waiter who humored me
and took a second look at where we were seated for Easter Brunch. 
Not sure when she will get to wear it again ...lol!!!

This is one of my favorite pics from the day.
She looks so thoughtful 


Brother and Sister
Nothing could be sweeter

If I only knew what secrets they were sharing.

Hope you had a Happy Easter!

Pattern Testers Needed

Wednesday, August 10, 2011

Sorry guys no Slipcover Craziness this week.
My husband was out of town for work all last week
and we went to Upstate New York for cousins wedding.

What I have been focusing on with what little free time I've had
is the Sassafras Dress
The pattern is off at the graders and I should have it back early next week.

So I am looking for a  few followers to be pattern testers
and give me some input on our newest pattern.
If selected you will be required to sew one up in the size assigned to you
with in two weeks of receiving the pattern.
You will need to post pics and write a short post about being a pattern tester.

If you are up for the challenge leave me a comment with the size you are requesting
Then send an email to willowbeanstudio@gmail.com
with the size you requested in the subject line.

Sizes will be awarded on a first come first serve basis
So post your comments quickly before they are all gone.

Little Miss Sassafras
sizes 12months, 18 months, 24 months 2t, 3t, 4, 5 & 6

Little Miss Sassafras

Thursday, August 4, 2011

Not sure where she gets it from or where she picked it up
But when I asked Bean to model my newest dress pattern;
this is the look she gave me ...
Somewhere along the way she decided that all models pout and put their hand on their hips
Her poses got even better when I told her I needed
a closeup of the pleats on the dress above her belly.

She proceeded to pull her dress up to show off her belly
which ended up covering the pleats I wanted to highlight
KIDS
After I promised to reward her with a lollipop I was able to get the shots I was looking for

So here goes
Our Newest Pattern
Little Miss Sassafras
Named for Willow's behavior during our photo shoot.
I guess I can't get too mad

Happy 4th of July ...

Tuesday, July 5, 2011

Our family had a great time watching all the parades and fireworks yesterday!
Hope you had a great day with your family!

The Cranky Princess

Monday, June 13, 2011

You would never know from the expression on her face
that just 30 seconds earlier she was as happy as can be.
Especially since Mommy had made her a new tu-tu!


I think her temper tantrum lasted longer than it took to make the skirt.
To make this tu-tu skirt you need:
5/8 yard sparkle tulle
5/8 regular tulle
3/4 yard lining fabric
1" wide elastic (should be the circumference of child's waist plus 1")
the above quantities listed are for a size 3/4 skirt.

First I cut the sparkle tulle in half along the fold 
I then cut the regular tulle into 4 sections that were equal in length and width to 
the two sparkle tulle pieces.

I layered the sparkle tulle on top of two pieces of regular tulle.
You will now have two separate piles of tulle.

I took each pile and with my sewing machine ran a basting stitch across the top edge.

Now you are ready to create the lining.
I cut two rectangles out of my lining fabric that were the same length as my tulle.
To determine the width for the lining 
I took half my daughters waist circumference and added 4" to that number.
I joined the side seams with 1/2" seams and did a double roll hem at the bottom of the skirt.

Now take your two piles of tulle and gently pull the basting threads so that the 
pieces are the same width as one side of your skirt lining.
Pin one section to the front and the second to the back.
Attach with 1/2" seams.

Okay we are ready to finish off this skirt!
Take your elastic and over lap the back by a 1/2"
Using your sewing machine secure seam with a zig zag stitch.
Cut a rectangle that is 3 1/2" tall and 1" longer than the circumference of the skirt.
Close the back with 1/2" seams.
Fold piece in 1/2 with your elastic sandwiched in the middle.
Set to skirt top with 1/2" seams gently stretching the elastic as you g.
While setting the waistband to the skirt top 
make sure not to catch the elastic in your seam as this will hinder the elastics ability to stretch. 

Hopefully your little princess will not be as cranky as mine was 
upon the receiving her new skirt!


Our First Sewing Pattern To Be Released!

Wednesday, May 25, 2011

Well, we are almost there!
The pattern pieces are with the digitizer and
being converted from my hand drawn pieces to
beautiful clean lined computer generated images... YEAH! 
I miss my days working in the design room with the first pattern makers. 
Creating this pattern was like a trip back in time for me.
 To the days when I was working in New York in the apparel industry. 
I really had so much fun that it didn't feel like work :) 

The big day is Wednesday, June 1st
You will be able to purchase the PDF pattern
from my Etsy shop.
There is an Etsy tab at the top of my blog.
Just click on it to be taken there.

I would also like to take a moment and thank
Kim at 733, for all her support and allowing me
to use the photos of her daughter wearing the original dress!

It's Time For A Little Spring Cleaning

Saturday, April 2, 2011

I am in the middle of clearing out my kids' closets and making room for their spring clothes.  You know this involves trying on stuff from last spring/summer to see if anything still fits.  While doing this I discovered my son had a huge growth spurt and nothing from last year remotely fits.  I was so sad because he had several button down shirts that were worn once, maybe twice.  I didn't want to throw them out as they were like brand new and I really didn't want to give them away either.  This lead me to the following thought, "What crafty thing can I make from them?" 
I wonder if the Bean can wear them?
Aughh way to big ... then I realized I could make it into a dress! 


First I traced out the outline for the bodice while the shirt was on my daughter.  As you can see below I created a halter style dress.  Also if you look closely you can see the big black dot that was created when Bean wanted to draw on the shirt just like Mommy did!  Mental note next time use one of those washable fabric markers versus a permanent sharpie marker ... Eeeek!!  
I cut along the lines I had just drawn and below the collar stand.  Across the back I cut about an 1 1/4" above where I had determined her waistline to be; at this point I cut off the bottom of the front "skirt" section.  I turned under the edge along the front bodice and hem to clean finish the top.  To finish the back I created a 1" casing which I later inserted elastic to help keep the back snug.  I gathered the top of the front skirt and then set that section to the front bodice.  I felt like it still needed something to make it a bit more girly so I added a green satin ribbon at the waist to finish it off.
I am so happy with how this turned out.  Now if only Mother Nature would cooperate long enough for me to let her wear her new dress; after all it did snow in PA on April 1st!
This post was shared at the following linky parties;
                                       Made By You Monday             733blog Sugar and Spice
                                             The Girl Creative                  The Trendy Tree House


Big News!!!!

Tuesday, March 29, 2011

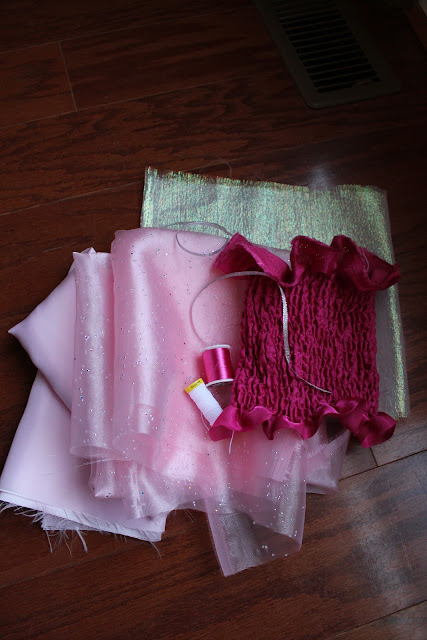
I don't know about you but the following collection of supplies just screams girl to me .... possibly a Pinkalicious girl!?!  I am so excited to share the following news Kim over at 733 a Creative Blog has selected me to design her DD's party dress for her 2nd birthday!  I can't even explain how excited I am over this opportunity.  I am a huge fan of Kim's blog.  I love stopping by and seeing what she's up to day to day, there's always something interesting happening.  Become a follower and be sure to stop back; cuz I feel a give away in the works in honor of this upcoming Pinkalicious party!!

Everyone Loves an Irish Kid

Thursday, March 17, 2011

I don't know about you but when I became a mother I had all these high expectations for myself.  I had a list of projects I was going to do annually for my kids, a St. Patricks Day dress being one of those items.  Well the bean is now 2 and we have celebrated 3 St. Patty's Day and I've only made one dress.  Last year I bought the cutest holiday  fabric, but ran out of time.  This year I had plenty of time but could not find the fabric I had already purchased and I was adamant I was not buying more St. Patricks' Day themed fabric.  Well the St. Patty's Day 2011 has come and gone and the search continues for my fabric.  Hopefully I will find it in time to make her a dress for next year!


 Leave me a comment, I'd love to know what are some of your ideas that have been left undone?

This post has been linked to the following parties :funkypolkadotgiraffe too-cute-tuesday

Someday Crafts Whatever goes Wednesday

Seamingly Smitten

Wednesday, February 9, 2011

I am so EXCITED Willow's birthday dress is being featured at  Seamingly Smitten!  I am so excited!  You have to go check out her blog super cute ideas tons of inspiration.  Thank you again Seamingly Smitten, for featuring my little bean!  Please head over and check out her blog, there are some really great ideas.  Her project portfolio has so many detailed tutorial to follow along with.  Happy sewing
                                                      http://seaminglysmitten.blogspot.com/
Related Posts Plugin for WordPress, Blogger...